How to Host: Resin Suncatcher Workshop
Workshop Overview, In Brief
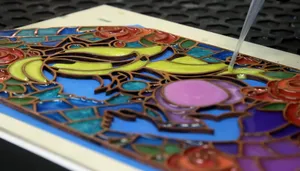
Section titled “Workshop Overview, In Brief”Make a stained-glass-inspired art piece using laser cutting and colored resin!
While there are pre-made designs, you also have the option to learn how to make your own design in Inkscape or Adobe Illustrator. Once the design is ready, we then cut the design using a laser cutter. This laser-cut frame will be used as a mold in which you fill with colored resin!
Workshop Overview, In Medium
Section titled “Workshop Overview, In Medium”This workshop involves making stained-glass-inspired window decorations via laser cutting and resin pouring. This will allow you to make some intricate shapes – no glass cutting skills needed!
Laser-cutting ready designs and design guide are posted on the wiki.
The frame and skeleton of the window decoration is created via laser cutting the material (wood or metal). Covering one side of the laser-cut frame with resin tape forms a mold on which we pour the resin.
To better understand the concept, here are two videos demonstrating the process.
Before the workshop, prepare pre-made templates for laser cutting. Old ones from previous semesters can be reused, and 1-2 new ones from workshop RSVP form ideas can be made. If desired, participants can find and select their own line art to make stained glass out of. PIs holding the workshop should be able to guide participants through the scaling and image tracing process.
After laser cutting, participants will have the option to spray paint their frame a metallic color, if using wood instead of metal. With the frame all done, use resin tape to cover the back of the frame to form a mold. Fill the mold with colored resin. Cure it with UV light, and all set.
Requested Supplies
Section titled “Requested Supplies”Laser Cutting
Section titled “Laser Cutting”| QTY | COST EA. (USD) | ||
|---|---|---|---|
| Wooden sheets, 1/8 inch thick, at least 4x4” | Usually in stock. Put some on reserve for the workshop. | - | - |
| 1/8” Hardbord | https://www.amazon.com/Ampersand-Hardbord-11-14-each/dp/B0027A79HI Sturdier wood and warp resistant. | 3 | 8.87 |
| 1/16” Stainless Steel Sheet | https://www.amazon.com/dp/B0D1MX9LYL | 1 | 13.99 |
| 1/16” Brass Sheet | https://www.amazon.com/dp/B0CFQQGCWW (2pcs) | 1 | 36.99 |
| 1/16” Anodized Black Aluminum Sheet | https://www.amazon.com/dp/B0DBK89H2P (3pcs) | 1 | 23.99 |
Miscellaneous
Section titled “Miscellaneous”| QTY | COST EA. (USD) | ||
|---|---|---|---|
| Metallic spray paints | Copper: https://www.amazon.com/dp/B0728497QV/?th=1 Gray/silver: https://www.amazon.com/Rust-Oleum-249128-Painters-11-Ounce-Aluminum/dp/B002BWOS80/ Gold: https://www.amazon.com/Rust-Oleum-1910830-Spray-Paint-Each/dp/B000QD3GPW/ Black: https://www.amazon.com/Krylon-K02790007-Fusion-Spray-Stainless/dp/B07LFP2CGB/ | x4 | 8.00 (avg.) |
| Thin accessory chain (20 m) | https://www.amazon.com/KYUNHOO-Stainless-Necklace-Jewelry-Extension/dp/B0C6TJPTX5/ | x1 | 14.98 |
| 4mm jump rings | https://www.amazon.com/dp/B07ZR6YFL7 | x1 | 5.99 |
| Suction cups with small hooks (14 ct) | https://www.amazon.com/GLUIT-Suction-Cup-Hooks-Stainless/dp/B0BYT3K8FF/ | x1 | 5.99 |
| Wire cutters | Usually in stock. | - | - |
Before the Workshop
Section titled “Before the Workshop”In the RSVP form, include an option to submit a description or a link to an image of what they are interested in making. If time permits, we can prepare additional templates to match their submissions. We’ll try to accommodate and make ~5 templates that are ready to laser cut. Definitely include a design that features Buzz!
Additionally, provide a choice for whether a participant would want to make their own template with our guidance at the day of the workshop. In the interest of speed, all templates are limited in size to approximately half of the standard wooden boards the Hive keeps in stock.
Set up the table with mixing cups, sticks, pipettes, and gloves. As people wrap up, bring out suction cups, jump rings, and chains for the final product.
Mix resin beforehand and provide participants with a palette of colors that they can further adjust the intensity of if desired. Mix the resin slowly to minimize the presence of air bubbles. When using mica powder, advise participants to use it sparingly, as small amounts go a long way.
Have things set up on all the tables for the day of
- Circular room table w/ resin tape and plastic film backing
- Laser cutting room table w/ resin cups and kits and mats
- Painting room table w/ spray paints and places to dry + heat gun
Detailed Instructions
Section titled “Detailed Instructions”- Have 2 PI volunteers in addition to the workshop host(s)
- One for laser cutting, one for paint booth, maybe one extra volunteer that can help with illustrator
- On the day of the workshop, participants gather on the first-floor circular room.
- Participants who are good to go with choosing one of our templates can start laser cutting right away.
- One PI will be stationed at the laser cutters and adjust to optimal settings.
- While waiting for their turn to laser cut, people can adjust our provided designs or create a template using line art they have found themselves.
- The circular lobby outside the Production Studio is a good place with table space for laptops.
- PIs proficient in Inkscape or Illustrator serve as a guide through this process.
- Line art weight should be adjusted to approx. 1/16” for sturdiness.
- Include attachment points for hangers if desired in the final product.
- After finishing laser cutting, lead the participants to the spray paint booth. The paint will need to dry before proceeding to the next step.
- Bring a heat gun to help speed up drying
- Thin coats dry much faster. Apply multiple thin coats rather than one heavy coat
- After the frame is fully dry, the next step is to pour resin. Before pouring resin, cover one side of the frame with resin molding tape*.
- Cut a piece of plastic film to place underneath, for additional support
- Provide each person with their kit. They may mix their own resin in addition to the provided colors.
- Advise to mix the resin slowly to minimize air bubbles
- Use mica powder sparingly, as a little goes a long way.
- Use small paint brushes to gently scoop the powder into the resin. Use wooden popsicle sticks to mix the resin itself.
- Done pouring? Time to cure the resin. Small designs can go inside the curing station and will be ready within 10 minutes. Larger designs can be left in the sunlight for 2-4 hours to cure.
- It can be helpful to cure the resin as you pour, to minimize the leakage across sections. Depends on availability of UV flashlights.
- Since we are curing with UV light, you’ll have a easier time curing if the resin is translucent rather than opaque.
- For the finishing steps, peel off the backing resin tape. Participants have the option to measure and attach small chains and fasteners to their design. Enough suction cups will be provided for everyone to get at least one. Woohoo, all set!
*Masking tape can be used in place of resin molding tape. However, masking tape does not peel off as nicely when used as a resin mold.
Additional Notes and Tips
Section titled “Additional Notes and Tips”- When using the resin curing stations in the semi clean room, use a pre-set that does not involve heat, since it led to warping and bubbles.
- Give participants the written design guide ahead of time for those who want to make their own.
- Also clean the laser cutter lenses and make sure the machines are in tip top shape if possible. It’s not fun to redo laser cuts that almost but not quite cut all the way through.
- Nice to have canvas drop cloth to better manage resin spills
- Meet in the circular room! Laser cutting room is noisy
- Bring the portable display down?
- Could be helpful to prepare a presentation illustrating the process
- Used disposable 1 oz and 10 oz mixing cups for the first iteration of the workshop. In the interest of sustainability, swapped these out with silicone mix and pour cups.
- Labubu